Jekyll2025-01-21T01:14:05+01:00https://gabriels.cloud/feed.xmlGabriel’s WebsiteMy personal blog and portfolio in one place.GabrielRGButtons: Creating Animated Rainbow Borders for Buttons2024-08-26T10:16:00+02:002024-08-26T10:16:00+02:00https://gabriels.cloud/2024/08/26/rgbuttons-creating-animated-rainbow-borders-for-buttonsRecently I did some frontend work and wanted to spice up my buttons.
I like rainbow colors and nice animations, so why not give buttons a moving rainbow border on hover?
CSS is powerful but often has multiple ways that appear to accomplish the same thing, at least on the surface.
The devil is in the details, so I tried different approaches to achieve this effect.
First, border supports gradients, so maybe we can use this property?
Taken from this excellent blog post, it’s almost what
I want. Unfortunately, though, it doesn’t support rounded edges.
Also, it uses a custom property, and despite the post being three years
old, custom properties are still not a
thing in all browsers. There’s a workaround included, essentially generating
the expected animation for the browser, but it’s a lot of boilerplate, and I don’t like bloating my file just for this.
Another option is using a pseudo-element behind the button and setting its background. I played around with this, and
it seemed like the best option.
Unfortunately, I only found an example with a linear gradient while I wanted a conic one. Changing the gradient type is
easy, but then the animation was broken. Moving the background-position works only for the scaled up linear gradient.
If I apply a rotate animation directly, we get this:
We need to clip away anything not part of the border.
I searched for clipping but only ended up
with clip-path, svgs and the likes,
which could maybe work, but would be a hassle. masks also didn’t look too promising.
Finally, overflow saved me. I hadn’t seen the overflow: clip property, and low and behold, it also comes
with overflow-clip-margin, giving us the space
for a beautiful border. This is perfect!
Now, I just had to center the pseudo-element, one of the most infamous tasks in CSS. Luckily inset: 0 combined
with margin: auto gets us almost there, but for some reason, we also need to override left with the explicit
indentation to offset the oversize width.
This is the final result, and although it feels a bit cursed, it works™:
]]>GabrielHow to export SQL databases with limited permissions2024-08-12T23:07:00+02:002024-08-12T23:07:00+02:00https://gabriels.cloud/2024/08/12/how-to-export-sql-databases-with-limited-permissionsSometimes you need to export a database, for backups or for transferring the data into another DB.
The usual way of exporting a Postgres database is to use pg_dump, but if you’re using a shared hosting provider, you
might not have the necessary permissions to do so.
Then any pg_dump commands will fail with an error like this:
pg_dump: error: query failed: ERROR: permission denied for view pg_roles
I don’t know why pg_dump needs to access the pg_roles view, but it does and fails if it can’t.
Maybe we can find a way to skip this roles access? I don’t want any roles, I just want the data.
There are multiple promising options in the help menu that I tried:
-O, --no-owner               skip restoration of object ownership in plain-text format
-a, --data-only              dump only the data, not the schema
-t, --table=PATTERN          dump the specified table(s) only
Unfortunately, none of them solved the problem, the error persisted.
So I searched for a different way to export the data and I found a way.
It’s not as elegant as pg_dump, but it works and that’s what counts.
We can use the COPY command to move data between a table and
a file.
Here’s StackOverflow’s way to export a table from any SQL database into
a CSV file:
echo"\COPY (select * from table ) TO 'table.csv' (format CSV);"> my_query.sql
psql <database> -af my_query.sql
We use the backslash to make it a client command, so psql will look in the current directory for the file.
If you use COPY without the backslash, the server will look for the file.
An even shorter answer without a helper file is found
in the comments.
For importing the data back into a database, you can then use the \COPY command again:
psql <database> -a-c"\COPY table FROM 'table.csv' CSV"
]]>GabrielI analysed 1 Million digits of Pi2024-07-07T15:56:00+02:002024-07-07T15:56:00+02:00https://gabriels.cloud/2024/07/07/1-million-digits-of-pi-analysedI analysed the distribution of numbers in the first million digits of π.
You can download them for example
from PILookup (direct download link)
if you want to follow along.
Don’t forget to extract the zip file!
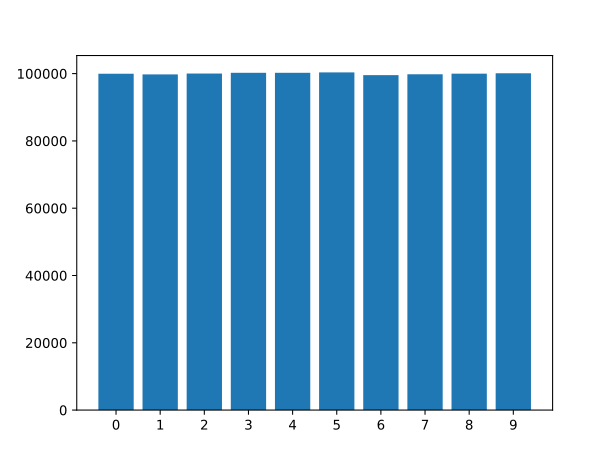
A simple Python script is enough to read the file and count the occurrences of each digit.
We can use a dictionary to store the counts, which is initialised with 0 for each digit.
The distribution is pretty even, so you might consider using Pi as a (pseudo) random number generator.
It would be pretty good on its
own (study 1, study 2, 10 million digits),
but randomness is usually meant as unguessable numbers (at least without significant effort).
As soon as someone recognizes the sequence, the surprise is gone and for example getting “random” rewards in a game
becomes predictable and boring.
On the other hand, most people only know the first few digits of Pi, so if you start with a large enough offset, you
should be fine.
]]>GabrielAlways commit2024-05-25T09:24:00+02:002024-05-25T09:24:00+02:00https://gabriels.cloud/2024/05/25/always-commitNo, this is not a relationship or life guide; it’s only meant for software, specifically Version Control Software, short
VCS. I also only use Git; the principle should apply to all of them nonetheless.
I like neat and tidy things, so I’m wary of when and what I commit. Work in progress rarely makes it into Git history
because I am sure I will work on it tomorrow and so I can save myself the hassle of a non-compiling, ugly commit.
Obviously, this doesn’t always work out, and there’s a single big commit after quite some time, if ever.
Sometimes, though, it’s the other way around; I add feature after feature so quickly that I don’t stop to commit in
between and end up with a massive changelog.
Neither is great, I too think commits should be
Force-pushing is an option to literally rewrite history, but it causes other problems. Every single repository clone
needs to adapt, making this option unfeasible for projects developed together with others. Even if it’s a hobby project
and I’m the only contributor, there are still often two clones, one on my laptop and another on my PC. This then
requires “force pulling”, git fetch --all && git reset --hard origin/main,
which I not only have to look up how to do (had, thanks to this post) but also leaves me uncertain what potentially
significant changes and local files I will lose.
Resetting Git is not an operation one should do every day.
Some might solve this problem by creating feature branches and subsequentially squashing, leaving a single,
self-contained, and well-tested commit.
Maybe I should try this sometime, but despite this obviously not fit for more than one developer approach, I like the
simplicity of having a single branch: no merge conflicts (at least in theory) and not having to specify branch names for
Git commands.
You might have guessed what I’m hinting at, yes, I do push (sometimes even force-push 😲) directly to the main branch.
Committing often helps me restore examples or give seemingly failed options another try. It also makes changes from
templates or generated code visible, which is a good indicator for the intended outcome and thus helps in updating.
Paying the small price of a less-than-perfect history is the price I can hopefully convince myself to pay. Software
isn’t perfect either, so why should its development be?
No one’s going to count commits; some might even interpret higher numbers as better.
Coming to the only logical conclusion after all of this, I just committed this post. Have a great day and a cat:
]]>GabrielNeon Grow - Get big or get eaten2024-03-19T22:36:00+01:002024-03-19T22:36:00+01:00https://gabriels.cloud/2024/03/19/neon-grow-an-io-gameThis is my take on an io game. You’re a big blob competing to become the biggest blob. Doesn’t that sound wonderful?
To spice things up, I also added a few powerups. You can grow faster, move faster, jump higher or activate a magnet.
The game is written in Unity and C#, born out of playing with the randomly colored spheres example.
I use the Epic Games Online Services for matchmaking. I even integrated it
further, you can log in with your Epic Account and invite friends to join you. This doesn’t mean you have to use an Epic
Account, you can also play without logging in or even on the local LAN.
This wasn’t easy to accomplish, much less as easy as it is now for the user at the tip of a finger.
If you’ve used Mirror before, you’ll know each of those requires a
different Transport. Each one should be on
a Don’t Destroy On Load object and
the NetworkManager needs a reference to it; so why not put all three of them on the same Manager?
Well, because it’s three different things, they require different setups. For example the Epic Games Transport requires
Epic Application Details, and finding other players on the local LAN requires a NetworkDiscovery component.
So I made three different NetworkManagers and dynamically switch between them. It’s unfortunately slightly hacky
because statics are involved, Transport.active is cared for by the active Transport
and NetworkManager.ResetStatics() does the rest.
To abstract this away, I made a Manager interface and a struct that’s used to join lobbies.
My script also handles dependent GameObjects like the friends UI and loads the player name.
To solve initialization issues with the Epic SDK all managers start active, then all but the first one are disabled.
While I appreciate the free service Epic provides, I hold a slight grudges against the way the Epic SDK has to be used.
Let’s say we want to get a friend list. We first have to call QueryFriends and pass a callback. In this callback we
can then check for success and store the result of GetFriendsCount. Equipped with that, we can now loop over all
friends and call GetFriendAtIndex to get the friend’s EpicAccountId.
This allows us to QueryPresence and then, in a callback again, save the status. Finally, we can QueryUserInfo and
then, in another callback of course, copy it into our garbage-collected code.
All of these calls do not take simple arguments, no, they take a <function name>Options struct each. Did we forget
to check any callbacks for a successful result, by the way?
In my opinion, this is quite a lot of boilerplatey code for something pretty simple. I’d rather have a
simple GetFriendList call that returns a list of Friend objects with a Presence and UserInfo property.
The lobby provides lots of customization options. Select one of five maps with different looks and paths to the
treasure and 13 cute wobbling player models you can color in the entirety of RGB.
Of course a proper lobby allows managing players, invite your friends with the integrated friends list and watch their
avatars pop up in your game.
Now for some actual game mechanics, you can move around with WASD, jump with space and use the mouse to steer the
camera.
PowerUps are activated with the number keys and come with different cooldowns, so use them wisely.
On mobile two joysticks are used for movement and camera.
You can grow by eating the colored objects or smaller blobs. For extra points activate the double multiplier or master
the obstacles to get the treasure at the top. The treasure is worth a lot of points, but needs to recharge.
There’s no official ending for now, just a message when a player reaches 10k points. If you get eaten, you can leave the
game and rejoin or spectate; a slight caveat: the host should not leave because that would end the game for everyone.
There’s no demo to test it right in your browser because the EOS SDK does not support it, but the game and source
code will be eventually available via GitHub.
]]>GabrielLife and Death2024-03-12T20:41:00+01:002024-03-19T00:00:00+01:00https://gabriels.cloud/2024/03/12/life-and-deathYou may have heard of Conway’s Game of Life, an infinite grid
of dying and living cells. It’s normally a zero-player game and the only parameter is the initial state of the grid. The
game then evolves according to a set of rules. The amount of neighbours determines the fate of a cell in the next round.
A cell with 3 neighbours will live, a cell with 2 neighbours will stay the same and every other cell will die.
So, I started implementing this simulation in Unity and C#. First, I tried spawning real 3D objects alias cubes to
create the grid which comes with great freedom for spectacular visual effects like custom models or an animated camera.
The performance impact was pretty noticeable though, especially on larger grids, and it didn’t fit the simple but
elegant theme I was going for. For those reasons I went with
a tile map.
Then I chose interesting patterns
from Wikipedia
and this site, and brought them into the game. The most famous one is
the glider, a pattern that moves across the grid, but I also added a few more like the blinker, the beacon and the
glider gun.
Based on their behaviour I organized them into categories, and you can place each one with a simple click,
Internally, the entire field is stored as a 2D array of a custom struct that contains data like the state of the cell.
In FixedUpdate the game checks the state of each cell and updates it according to the rules. Nothing fancy, and there’s
probably room for improvement. One could cache patterns and their evolution which saves calculating this again. That’s
what HashLife does. Another possible improvement could be a different way of
rendering the cells, maybe with a shader directly into a RawTexture. Especially when zooming the tile map causes a
noticeable hiccup.
While this may be interesting to mathematicians and computer scientists, we need more for a game, especially a
multiplayer one. So I added a few features to make it more interesting.
First of all, the game now has a competitive aspect. Each cell belongs to a player and shows that with a color.
Secondly, the game does not just run all the time, it stops every x generations and waits for player input. Each player
can change a configurable amount of cells individually or by placing figures. The game then evolves according to
the rules (also configurable) for a set amount of steps. If all of a player’s cells die, he’s out. The last player
standing wins.
You can match up with friends on the same network and play together. One hosts a game and the others can join.
While you’re in the lobby, choose a color and set your name. The host can also change options for the game like the
amount of cells a players can edit.
If you disable “Out at 0 cells”, you can play forever, even in single player, because the game will never end.
I also added zooming and a screenshot feature. You can even share screenshots using the native Android/iOS UI thanks
to this plugin.
I’ve made a quick WebGL port of the game, so you can test it right here in your browser. Unfortunately, certain features
are only available when actually installing the game, due to the security measures modern browsers implement.
For example discovering other players on the local network doesn’t work, so this demo is single player only.
The entire project is available on GitHub, but there’s no
binaries for now. I added binaries for Windows, Mac, Linux and Android, check
the releases.
]]>GabrielEven More Features for WoBot2024-03-06T20:38:00+01:002024-03-06T20:38:00+01:00https://gabriels.cloud/2024/03/06/even-more-features-for-wobotThis article is the third part in the WoBot series and the last for the moment. All the features
WoBot currently has should now be covered.
Automatic Replies and Reactions
Whether for a help message or fun with friends, automatic replies provide plenty of options. You can define multiple
keywords per message, the embed’s color, and a user on whose behalf this is done. This user can also be pinged. The
reply even supports magic strings to refer to the user or the number of times it has been used, creating unique
experiences for
your server.
Automatic reactions can highlight special words. Say you like bread and cats; then you’d set up reactions to heart any
baguette messages and animate any mentions of cats. The configuration for this would look like this:
Of course, this also works with custom/animated emojis; WoBot just needs to be on the server with those emojis. Then you
can take the ID of the emoji and use it in the configuration.
Events
Discord has a built-in event calendar, which is a great way to organize for example meetups.
To help keep the conversation organized, we’d like a new thread per event, which needs to be created. Another nice thing
would be an announcement so others know this event will happen. WoBot can do all of that with a single event command.
It even adds a 👍 and a ❔ reaction to the announcement so people can easily show whether they will attend.
Another great feature is the ability to export those events to a calendar. Discord offers this already on the desktop
version, WoBot
supplements it on mobile.
Reaction Roles
Reaction roles are a great way to let users express their preferences. You can use it to choose a language, for example,
or events to ping you for. Adding a new reaction role with WoBot is really easy; use the command with the role
and then react where you want it to be added. The same goes for removing a role.
Reminders
Have you had a conversation on Discord and then thought: “Ahh, I really need to think of that later”?
You can do precisely that with WoBot. Simply tell it when and what to remind you of, and rest easy knowing it will do
so.
You can also use regular Discord markdown and pings in the message to have others get reminded, too. Only @everyone
and @here are disabled for obvious reasons.
Have a nice day, and see you in the next article!
]]>GabrielBalanced - a Real Time Strategy prototype2024-03-03T17:32:00+01:002024-03-03T17:32:00+01:00https://gabriels.cloud/2024/03/03/balanced-a-real-time-strategy-prototypeRecently, I implemented one of many game ideas. Let’s start with the basics: each match involves two players sending
troops to defeat their opponent’s castle. So far, so good. Many people have implemented this part already. Now, one of
the hard parts of such a game is balancing, the art of adjusting troops’ attributes so that no one strategy is too
powerful.
I’ve come up with an easier solution for this problem (or maybe just a more complicated version):
The entire battlefield is a big scale, and every troop has a weight calculated from damage and health. If your
attack is too strong, all the troops will fall down, giving your opponent a chance to recover.
Tech-Stack
As I wanted to quickly get my hands on a prototype, I chose Unity, which I’m already familiar
with.
For the networking part, I used Mirror, a high-level networking library based on
previous versions of Unity’s Networking. While developing multiplayer games, I highly
recommend ParrelSync; the plugin allows you to start a second Unity Editor
with the same project. ParrelSync is a huge time saver as you can simulate two players without building and running the
game and have the editor view on both sides.
Main Mechanic: The Scale
First, I worked on the main mechanic, the moving scale. That’s pretty doable with Unity’s physics engine: a sprite with
a Box2D Collider plus a Rigidbody2D as the ground and then some joint attachment. I had not worked a lot with joints
before, so I made an entire scene dedicated to experimenting with them:
It’s not the most beautiful scene, but it was a good way to get a feeling for the different joint types and how they
work.
Ultimately, I decided to go with a spring joint on each end. This provides a fairly stable connection while also
allowing for rapid displacement of troops.
Implementation Issues
Next up was the actual gameplay. I spent quite a long time on “the resolution issue”: mobile devices can have varying
screen sizes, but the scale should always span the entire screen (ignoring the two castles). First, I tried using
the PositionUtil script to calculate the desired size and position, but this quickly became very complicated. The
castles shouldn’t be split on the edge of the screen but rather fully visible, the scale needs to take the
castles into account, and so on.
I ended up using a hacky solution: there’s a script with the sole purpose of setting the camera’s
aspectRatio to 16:9. If you can think of a better way, please let me know.
The networking came with its own bunch of bugs and issues, but as I’ve worked with Mirror before, this went pretty well.
There’s an obvious design issue caused by not having dedicated servers. One of the players needs to be a host, both
server and client at the same time, and as the server is authoritative and knows everything, this player could cheat
without limits. For a LAN-only prototype, this is not an issue, though.
Gameplay
There’s an energy bar and four different types of troops for now. Big thanks
to TrulyMalicious for providing free graphics; these cute images really improve the
look.
Now let’s see some actual gameplay:
Then I also threw together a main menu, and it’s a game. Play means you’re the server, Find Server allows you to join a
game on the local network, and Exit closes the game.
How to play / Source Code
If you want to play it, download the binary for your OS and grab
a friend. Player One hits Play, and Player Two joins the game with Find Server. There is currently no way to restart
the game after you’ve won, so you’ll have to close and reopen the game ;).
The entire project is available on GitHub if you want to experiment with
it further.
]]>GabrielMore Features for WoBot2024-02-24T17:36:00+01:002024-02-24T17:36:00+01:00https://gabriels.cloud/2024/02/24/more-features-for-wobotThe Rust saga continues; here’s the promised follow-up to the first post about WoBot.
Let’s talk about some more features WoBot has.
Canteen
We’re a group of students and often eat together in the canteen. Surprisingly, this comes with lots of tasks that can be
automated.
Meeting up
The canteen is quite large, and it can be challenging to find each other. It wasn’t clear how to solve this problem
until someday we got our hands on the floor plan. As chance would have it, this was an edited version with the grid from
battleships overlaid. This instantly struck me, and I added a command to say: “I’m at B5” and then WoBot edits the
profile picture into the plan. It even works with multiple people in the same cell thanks
to the stitchy crate:
The command name cruisine is a portmanteau of cuisine and cruise ship, as the floor plan looks like a battleship
grid.
It also supports an expiry time (1 hour by default), so the profile picture is automatically removed.
This is quite useful as no one eats for hours, and having to remove oneself would be annoying.
The current menu
Amazingly, our canteens provide websites that include the food that will be served. As there are multiple canteens with
different websites, it’d be nice to get a quick overview of all of them from Discord. Scraping websites is luckily not
needed as other students have already done the work and created the EAT API.
With this API, WoBot can show you the menu for the current day or the entire week. For convenience, Holidays and
weekends are automatically skipped when displaying the daily offerings.
Both commands also let you choose the canteen, so no matter what campus we’re on, we can always take a quick look at the
available food:
Memes
Discord is not only about text; images play a huge role, too. Accordingly, WoBot comes with some commands related to
images, especially memes.
Obama
Do you know the iconic meme of Obama giving himself a medal? It’s a great meme template, and WoBot has a command to
detect people reacting or replying to their own messages and send a fitting meme. It’s a fun little feature.
Cutie pie
Would you like to tell your friends how cute they are? Now you can with the cutiepie command:
Capybara facts
Have you ever wondered what capybaras are capable of? Thanks to the capybara command
and the CAPI, you can easily get some facts together with cute images:
Capybaras have a calm and gentle demeanor, which makes them popular in zoos and sometimes as pets.
Image editing
A specialized meme command takes any image URL and up to two texts with position, size, and optional color
arguments to create a new picture. Commands aren’t suited for image editing as you only once get
feedback, so you’d have to know the positions beforehand or try around a lot, which is not a pleasant
user experience.
Finding the suitable meme template or image URL on top is even more annoying, and I can’t remember anyone ever using
this
feature.
As Discord now has also rolled out the Remix feature, which
comes
with an
entire image editor, I can remove this feature without any second thoughts.
Features / ToDo List
Another thing that came up quite often while developing and testing the bot was ideas for new features or changes to
existing ones. So I asked myself: What if WoBot could keep track of these ideas and display them nicely?
That’s how the features command was born. Users can add, rename, and delete Features but also move them
between different states. With ToDo, Implemented, Rejected, and Postponed, all needs are covered.
There’s also a list command that supports filtering for a specific state:
Conclusion
With this post, I’ve covered many of WoBot’s features, but not all of them, so there might be another part. I hope you
enjoyed reading about them and got some inspiration for your own bot.
]]>GabrielEvaluating Frontmatter with a Jekyll Plugin2024-02-20T15:18:00+01:002024-02-22T00:00:00+01:00https://gabriels.cloud/2024/02/20/evaluating-frontmatter-jekyll-pluginJekyll pages have a metadata field date, which can be set to show when they were updated1. For the homepage, I
wanted it to be the current (at build time) date. I could have manually changed it each time, but that’s annoying and
easy to forget. This also seemed like a task I could easily automate.
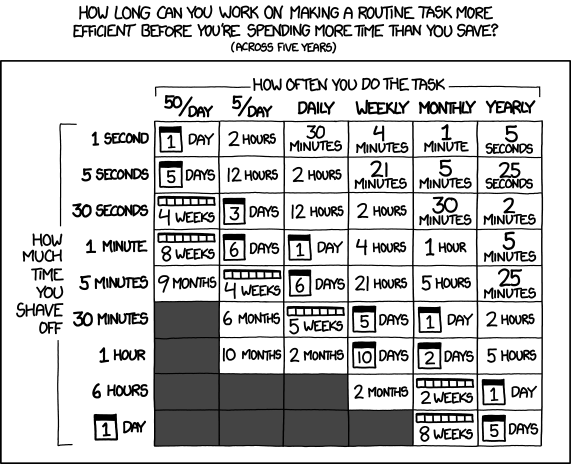
XKCD 1205: Is It Worth the Time?
So, let’s start by looking at the front matter of a page. The frontmatter is
the part between the --- at the top of a Markdown file. Jekyll treats it specially and lets you set the post’s title,
date, tags, and other properties.
The body of a blog post is Liquid, and in there, I simply could have used
{{ site.time }} , but the frontmatter is YAML and not liquefied that way.
This
problem hasbeenencounteredbefore.
Unfortunately, none of the mentioned solutions worked directly for me, but from the last one, I got the idea of writing
a plugin.
So I looked at the excellent docs and quickly pieced together a plugin
that evaluates any values in frontmatter looking like eval(<code>). The code is extracted with a regex and then
passed to Ruby’s eval function.
For example date: 'eval(site.time.strftime("%Y-%m-%d %H:%M:%S"))' will be evaluated to the current date.
As the code inside eval is executed in the context of the generator, it has access to all variables and methods it
needs, like the current page or the entire site.
Obviously, this allows arbitrary code execution, so I marked the generator is as safe false.
I didn’t have experience with Ruby before, but the plugin was pretty simple, and Ruby
uses the same concepts as other languages I already know. Judging by the bit of code I wrote, it’s an excellent
language, and I might take a look at it again in the future.
The entire source code is available on GitHub if you want
to use it.
I’ve since found out the date tag is used in the metadata as first published on, so I’ve set it to the correct
non-dynamic date for the homepage. The update tag is called last_modified_at. ↩